From visibility and engagement to a well-organized crowd flow, an event’s layout sets the tone for the attendee experience.
But let’s be real — creating the perfect event layout has its challenges. Venue limitations, capacity requirements, and other unexpected hurdles can quickly become roadblocks.
The good news? I’ve spent hours testing out event layout tools, so you don’t have to. There’s no need to thank me — just pull up your favorite notes app because we’ve got the features you need, examples of events doing it right, and what makes these layouts “tick.”
Here are my tips for finding the perfect platform, features to look out for, and 10 inspiring layout examples to get you started.
Table of contents
What to look for in an event layout software
How to use Eventbrite’s event layout software to enhance your event planning
Popular layout ideas for 4 types of events
Plan your perfect event layout with Eventbrite

What to look for in an event layout software
I’ve spent a lot of time testing and trialing different layout platforms.
My research — including my experience working with countless event organizers at Eventbrite — revealed that there are some pretty consistent features that simplify the event layout organization and management process.
Precise space planning
Getting your layout right is super important for planning. When you map out the space accurately, you can easily see how to fit everything in—vendors, equipment, stages—so there’s plenty of room for it all.
Space planning also helps you decide on capacity. You can identify the maximum number of guests (which ensures you sell as many tickets as possible) without overfilling the space.
Not only can this impact the guest experience (no one wants to be crammed into a venue like sardines in a tin), but it also ensures compliance with safety standards. For example, creating unobstructed paths to emergency exits to comply with fire codes.
Collaboration with vendors and team members
From what I’ve seen, collaboration is non-negotiable in event planning. It keeps everyone on the same page, ensuring the event layout is accurate and aligned with all stakeholders’ input.
The ability to share interactive plans is probably one of the most valuable collaborative features. Using these features, you create the event layout and provide access to your suppliers and colleagues. Then, everyone can view, comment on, and suggest real-time layout updates.
This means no more endless email chains or static PDF attachments (hallelujah).
It also helps you manage last-minute changes. If a vendor requests additional booth space or one of your colleagues wants to rearrange VIP seating, you can make the updates instantly.
Layout visualization
With effective visualization, you can experiment with seating arrangements, stage setups, and traffic flow. This means you can:
- See how attendees will move through the space
- Spot potential bottlenecks
- Adjust the layout accordingly to enhance the overall experience
This feature is a game-changer for boosting engagement. You can try out different stage setups to make sure every seat has a good view or move exhibition booths around to get more foot traffic for sponsors.
Seeing these setups ahead of time helps avoid surprises during the event and makes everything run more smoothly.
Resource management
Software that contains a resource management solution can be extremely helpful for keeping track of what you need in your event space. In the wild, resource management features can help you visualize and decide where to add booths, stands, seating, stages, and sound equipment.
Mapping out venue dimensions and equipment needs means you only spend money on the essentials — which is great for your budget and profits. No more ordering extra chairs “just in case” or scrambling for more tables at the last minute.

When you align on layouts early, you can organize details like vendor placements and decor arrangements far enough ahead that last-minute changes, though inevitable, won’t be disruptive. It minimizes costly last-minute changes, unexpected expenses, and logistical headaches.
How to use Eventbrite’s event layout software to enhance your event planning
I’d be doing you a disservice if I didn’t explain how Eventbrite enhances event layout management.
Why?
Because it’s so easy to use and customizable.
Take a look at the reserved seating tool as an example. You can design a custom seating map by dragging and dropping seats, rows, and sections to match your event venue. Plus, add custom labels to sections, rows, or seats for easy navigation.

It’s not just the customizations and interface that make it useful for planning your event layout. Here are some of the other standout features that make it top of the list:
- Access pre-built event layout templates. I’ve heard many an event organizer talk about spending way too much time building event maps and layouts. But with Eventbrite, you can save time and jump straight into ready-made layout templates. You can still customize it to suit your specifications, but it’s quicker than starting from scratch each time.
- Streamline event layout planning and ticket sales. With Eventbrite, you can use the same map to plan your event and sell or assign reserved seats. No more switching between systems to update your event map when tickets sell — it’s all in one location.
- Manage seating changes. Last-minute changes to attendance can be frustrating, for sure. But with the Eventbrite dashboard, it’s super easy to adjust or reassign tickets quickly if attendees need to change seats.
- Add pricing tiers to your tickets. You can link ticket types to specific seats or sections to control pricing and availability when creating your event layout. For example, you could charge more for premium seats closer to the stage. It’s simple, fast, and easy to manage — pretty much everything you want in an event system.

Outside of planning your event layout, Eventbrite can help you manage your entire event from start to finish. From promoting events with Eventbrite Ads to tracking ticket sales in real time, it has everything you need to create the ultimate event for your ideal audience. You can even watch our Event Management Software Demo to find out more.
Popular layout ideas for 4 types of events
With an event layout system in place, it’s time to choose the best layout for your event — and it’s safe to say there’s a lot to choose from.
Based on my experience, these are some of the most common (and successful) layouts for different types of events.
1. Live music events
Live music event layouts vary depending on the type of event. A festival? That needs a pretty spacious layout. But an intimate jazz performance? Not quite so big.
Here are some examples of event layouts for live music performances.

Festival layout
Festival layouts are ideal for large indoor or outdoor events with various acts and performers.
The key to a successful festival layout is zoning. This means categorizing the location based on different activities, such as stages, vendor stalls, and food trucks.
Take the example of the Dallas Country Music Festival: Frisco by Austin Country, Folk & Blues Festivals. The music festival has:
- Five major concerts
- Artists and crafters
- Gourmet food trucks
- Craft beer and wine vendors
The layout has specific zones for all of their activities and suppliers. For example, the stage areas have ample, open seating for guests to sit with blankets, while artists and crafters have their own marketplace.

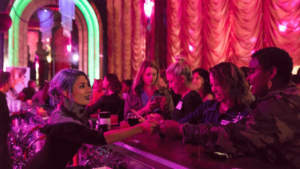
Lounge layout
A lounge-style layout has casual seating areas with sofas, armchairs, and coffee tables.
The poetry open mic nights from poetry me, please make good examples — though they’re not live music events, layout factors significantly into the overall experience for their audience. Guests sit on relaxed sofas and chairs in a casual space to watch the performers.
This layout is ideal for smaller and more intimate music events, such as an open mic night or a “night with [special guest].”
2. Professional and corporate events
When I talk to event organizers about layout planning, I always hear them ask, “What’s the goal of this event? Do we want guests to network, watch a speaker, or maybe both?”
Having clear answers to those questions really helps them figure out the best layout.
Here are some examples I’ve come across that might help get you started.

Classroom-style layout
A classroom layout has rows of tables and chairs, all facing a stage or screen. It’s ideal for workshops, lectures, training sessions, or educational events.
Seats often have a workspace for note-taking or personal items. For example, chairs with a pull-down writing workspace so guests can write or type while listening to the speaker.
However, you may need to accommodate more space when using these types of chairs. Review the measurements to confirm exactly how wide they are to avoid overselling tickets.

Virtual collaboration layout
50% of respondents in our TRNDS report said they would attend a hybrid or digital event they couldn’t get to in person, so it feels right to feature a layout that caters to virtual events.
So, how does a virtual collaboration layout work?
The layout often has collaboration areas where small groups can work in person, with virtual attendees joining remotely. The areas have screens and video conferencing equipment to allow virtual attendees to participate in the discussion.
To successfully plan and use this type of layout, start by deciding how you’d like the layout to impact virtual guests’ experience.
If groups are too large or the space is too big, virtual attendees will find it difficult to keep up with what’s happening and join the conversation. Keep them physically close to the group and limit group numbers to ensure virtual guests can easily participate in discussions.
Plan your next hybrid event

3. Immersive events
Immersive events are all about creating interactive, sensory experiences. They often involve guests as active participants in the story or environment rather than being passive observers.
Immersive layouts can be tricky to structure. They rarely involve a seating chart, and the goal is to create a dynamic space where attendees can freely move, explore, and engage with different elements of the experience.
But don’t worry — I’ve outlined some examples of preparing an immersive event layout.

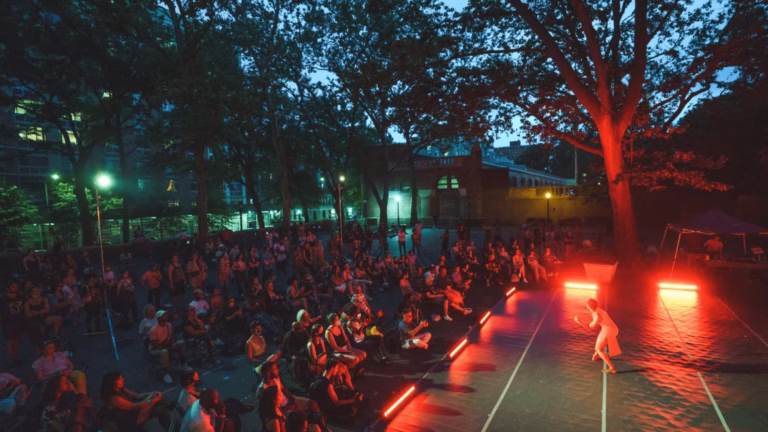
Exploration walk layout
For an exploration walk, you organize the layout like a journey. There are themed walkways that guide attendees through different sections. In each area, guests receive a new experience or reveal, like a storytelling moment that builds anticipation as they move through the event.
These events are helpful for brand activations, art shows, or themed events — especially around the holidays. A festive Christmas journey or a haunted Halloween walk are great ways to create memorable, shareable events that resonate with attendees.
💡 Pro Tip: Enhance immersion by aligning the event theme with a specific activity, like combining Temple SF’s yoga’s soothing flow with the ocean’s fluidity in its Immersive Ocean Flow event. This helps to deepen the thematic experience and further engages attendees through movement or interaction.

Infinity tunnel layout
An infinity tunnel layout involves preparing a themed tunnel for guests to walk through.
There are two ways to approach the infinity tunnel:
- Make it the main event. Guests navigate a tunnel labyrinth with engaging activities or challenges in each section.
- Use it as part of a bigger event. For example, it could be framed as the entrance to a festival or dance party, like the Tunnel of Love from Rockin(gham) Ballroom, where guests walk through the tunnel to get to the dance.
If you choose to make the tunnel the main event, consider how to structure the layout for the best guest experience. Segment the tunnel into distinct zones, use strategic anchor points with a different sensory focus, and consider floor patterns or signage to ensure guests navigate the space effectively.
4. Fundraising events
Fundraising events come in all sizes, from intimate gatherings to large-scale galas. The key to a successful layout is balancing the event’s scale with its atmosphere — whether you’re aiming for a cozy, personal experience or an expansive, high-energy environment that encourages mingling and bidding.
Plan your next fundraiser with Eventbrite

Here are a couple of layout examples for different-sized events:

Banquet-style layout
Banquets have round tables with seating for small groups, usually with a stage or performance area on one side of the venue. They’re ideal for larger fundraisers and galas in big venues where you want to sell as many seats and tables as possible.
When planning a banquet layout, think about guest visibility. Some of your guests may not have a great view of the stage because they’re way at the back, they’re facing the wrong way, or there are obstructions if they’re sitting at the side.
In this situation, you can:
- Consider lowering prices for seats with limited view
- Change the layout to cabaret style, which seats guests on three-quarters of the table, leaving one side open
The only downside to using the cabaret layout is that this limits the number of tickets you can sell.

Runway layout
Runways can be used for larger events (think Paris Fashion Week), but they don’t have to be. They can be an ideal format for an intimate fundraising event. Check out the Outfit Exchange Holiday Fashion Show by biteSiZeD MultiMedia as an example of these types of layouts in action.
Although the layout of a runway event is pretty simple, there are still some logistical elements to consider. For example, the runway should be well-lit so spectators can see the show without blinding people in the front row.

Plan your perfect event layout with Eventbrite
Choosing the right event layout is the first step to event success. But planning it effectively? That’s where you make or break your event. Use event layout software to play around with different options and choose the best structure for your ideal audience.
No matter what event layout you choose, you must provide a clear and easy way for attendees to choose seats and book tickets. With Eventbrite’s reserve seating tool, you can create a seating chart, customize your seating layout, and allow attendees to select their preferred seats.